Keratron Scout Support
Topographer Calibration Instructions *
Before you can use the Topographer, it must be calibrated. This simple operation takes just a few seconds. And since the Topographer is a portable instrument, we advise you to do routine calibration more often than with the full size table mounted Topographer (i.e. at least once a day and not just when installing, moving the VK or replacing the mires cone).
Calibration Sphere - ![]()
For battery powered units: remove the Topographer from the docking base follow the capture procedure
below; then return it in the docking base and click on the Calibrate icon. (Check that the value in the
Calibration Sphere box is the same as on your Calibration sphere. If not, click “Change” and correct the
value and click “OK: twice to complete calibration and the unit will be ready for use. For corded Topographers click on the Calibrate icon first then follow the capture procedure below. Click “OK” and the automated calibration process will complete calibration and the unit will be ready for use.
Test Sphere Capture Procedure: Press the "OD" or "OS" button on the Scout's membrane panel. Hold
the calibration sphere against the mires cone, making sure the two protrusions on the cone fit into the two
recesses on this tool. While holding the calibration sphere with your thumb and middle finger, use your
forefinger to rotate the alignment wheel. The rotation will move the sphere back and forth across the
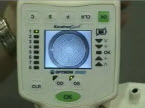
Topographer's alignment beam. The sphere is in proper position when the "OK" LED (right side of LCD screen on the Topographer's membrane) panel illuminates and the beeping is stable. Turn the wheel forth and back a little to adjust it so to be just in the middle the "OK" led is illuminated. Press the green OK button.
Holding Calibration Sphere over end of cone - 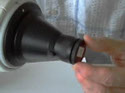
Click HERE to view a short video on how to Calibrate with Calibration Sphere.
Note: If the calibration sphere image was not exactly centered when you pressed the OK button the Topographer will instruct you to center the cross in the middle ring with the mouse and click to continue. Inspect images and answer questions.
Click HERE for Image Acquisition with Piccolo.
Click HERE for Image Acquisition Tips.