Keratron Scout Support
Image Acquisition Tips
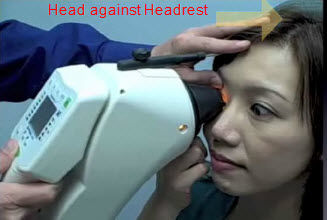
1. Patient should be seated and if in an examination chair the head should be against the chair’s headrest.
2. For patients with non-receding or non-protruding foreheads the cone should be in the mid range of it’s up and down positioning within the instrument. Patients with receding foreheads should have the cone in one of the upper positions and those with protruding foreheads or very deep-set eyes should have the cone adjusted to one of the lower stops to facilitate image capture. Slit lamp mount systems should have the cone at its mid range position but the position can be changed to facilitate various orbit depths and positions.
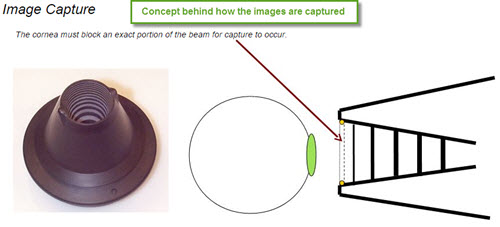
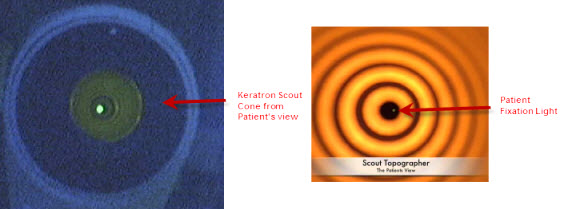
3. The patient should be advised that they should look at the green fixation light inside the cone and that they can blink normally.
4. The base of the Scout should be parallel with the floor with the cone level with the patient’s eyes. The operator should observe the patient and bring the Scout towards the patient’s face with the cone pointing at the eye. When the headrest is about 1 to 2 inches from the patient’s forehead the operator should shift observation to the Scout LCD screen and locate the patient eye in the
screen.
5. While observing the patient’s eye on the LCD screen continue to approach the patient with the
Scout keeping the image of the eye as centered as possible until the forehead rest touches the
patient’s forehead.
6. Continue forward towards the patient until the beeping and the position indicator lights on the
Scout’s display panel show that the position is above the center “OK” indication.
7. Have the patient blink to distribute an even tear film and then open both eyes wide. Press and hold the “OK” button.
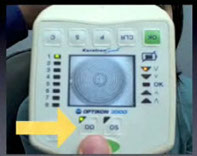
8. Confirm centering and slowly withdraw the instrument so that the beeping and position indicator LED’s come down and cross the center “OK” point where the image will be acquired automatically. Repeat for the other eye.
9. It is imperative that the operator becomes familiar with the centering technique that involves moving the Scout up and down and side to side. For many the tendency will be to incorrectly pivot the Scout about the forehead rest. This will not result in centering motions. Rather, move the entire Scout up/down/left/right. (Note that the hand, eye coordination will become second nature with just a little practice.)
10. Instruct the patient to open BOTH eyes as WIDE as possible. (If necessary you can help open the eye with your fingers outside of the cone.)
11. Acquire at least 3 images per eye; observe automatic repeatability check, eventually saving the best OD and OS images. Up to a maximum of 8 images can be captured.
Note: It is very important that the patient opens both eyes very wide, to avoid typical eyelashes artifacts (see last page in this manual). If the eyelash shadows reach the horizontal line passing through the center picture, they can fool the detection system and you will get a map with abnormally high curvatures. In case of doubt take more than one photo and check for repeatability. We suggest taking at least 4 photos of each eye. If necessary help the eye aperture with your fingers and re-instruct the patient to open widely.
Note: Do not waste time to align perfectly the cross within circles. Even a 4-5 rings error generates an error lower than 0.1 D. It is more important that the eyes are wide open.
Note: If the Tear Film is bad, ask the patient to blink. If any dust or grime doesn’t go away, ask the patient to gently rub his eyelids.
Click HERE to view actual video on how to capture with the Keratron Scout Topographer
Click HERE for Recall Patient Maps.